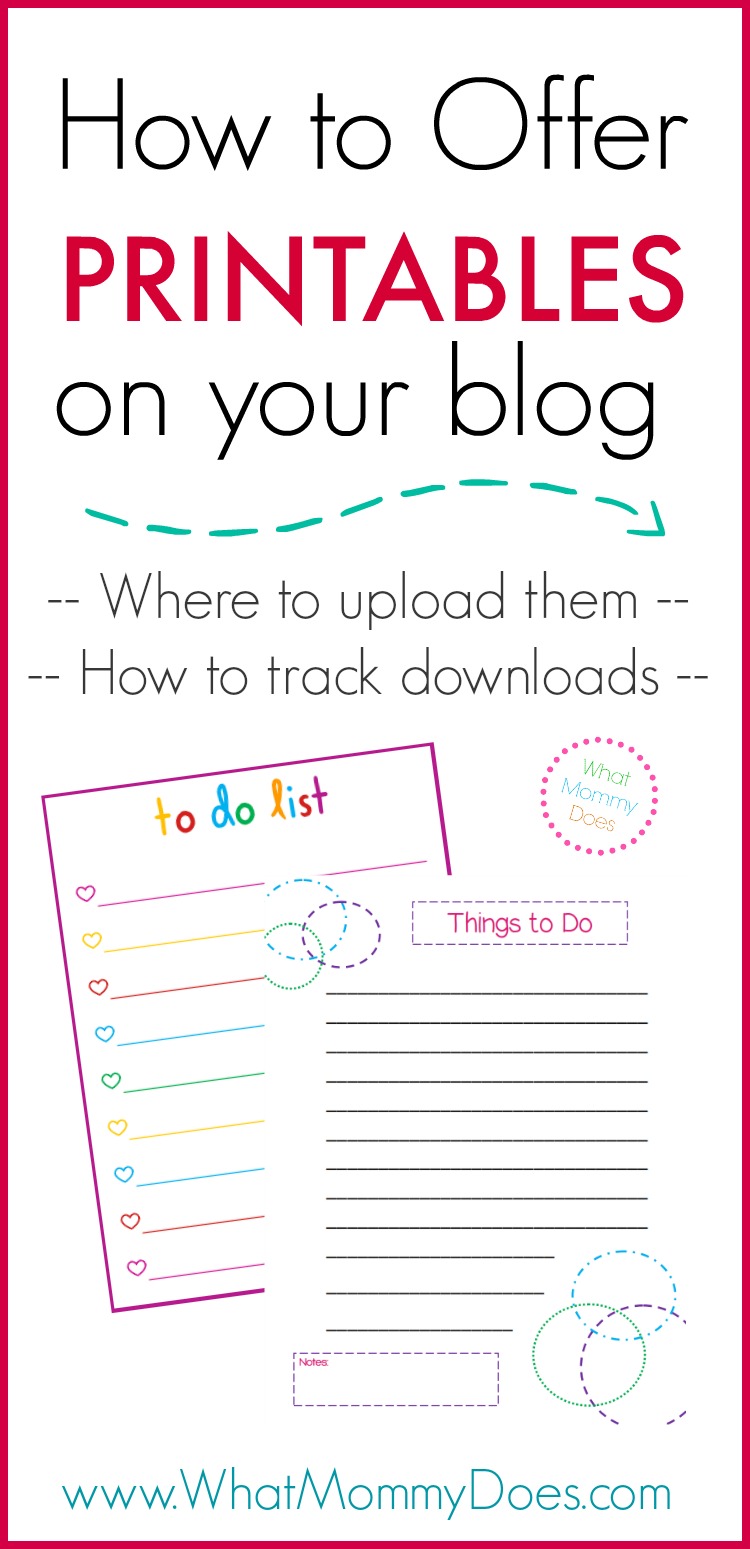
One of my favorite things to do as a blogger is create free printables for my readers. I find it quite relaxing! And readers LOVE getting freebies like this on your blog. I know a lot of bloggers want to offer printables for sale, as free downloads, or even as subscriber freebies.
If that’s you, then you might like this tutorial. This is just one of the ways I create printables using a combination of PicMonkey and Microsoft Publisher – both super low tech tools that I believe anyone can use.
How to Make Your Own Printables
I’ve listed the steps for creating printables below, including screenshots of every step. I recommend doing a test run as you read along. The first time will take you a little while, but after a few tries, you will be a pro!
Note: This is for printables that require a combo of design elements like shapes, images, fancy arrows, etc. If you only need to create a more plain printable like a to do list or checklist with only text and perhaps a few text boxes, then you go straight to Publisher and create it here OR you can even do that in Microsoft Word, although it’s harder to get margins right in Word, in my opinion.
Step 1 – Design Image
Navigate to www.picmonkey.com and create an 850 x 1100 px image by clicking on Design and typing those dimensions into the custom size boxes.
Step 2 – Add Images & Text
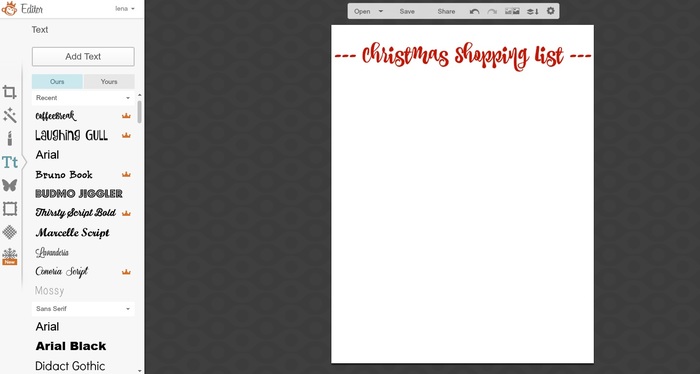
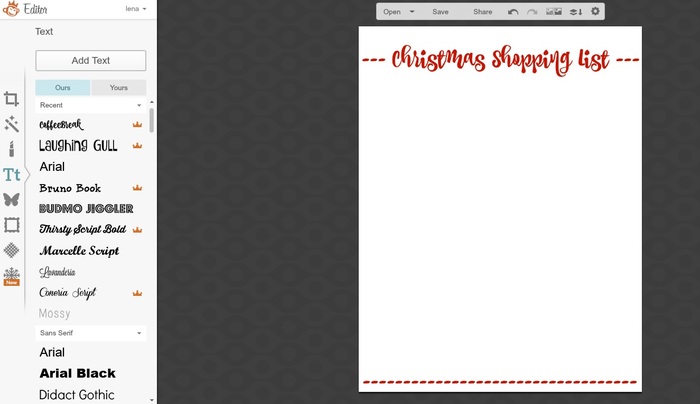
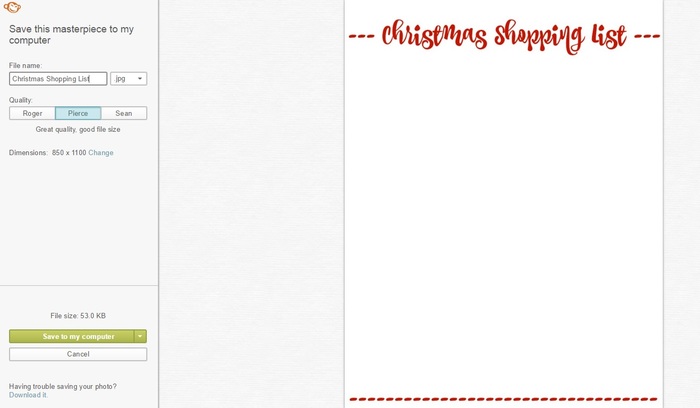
Design the bones of your printable using images, text, or other design elements like shapes. They have geometric shapes, arrows, hearts, snowflakes, seasonal icons, etc. For this example, I’m keeping it simple and choosing to write “Christmas Shopping List” across the top in CoffeeBreak font and adding some dashed lines.
Step 3 – Save the Image
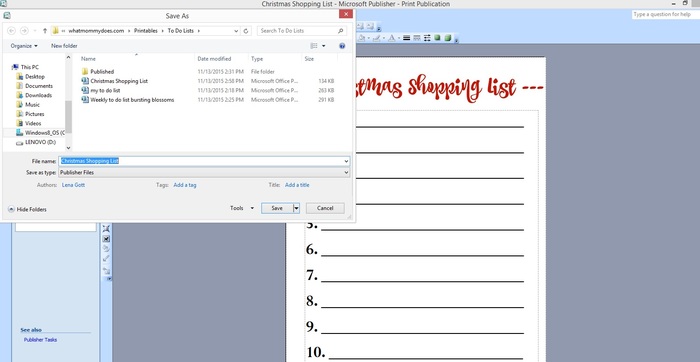
When you’re done, save the completed image to your computer as a JPEG file.
Step 4 – Open a Blank Publisher Doc
Next, open Microsoft Publisher, and create a blank letter sized page (8.5″ x 11″ size). This will ensure your final document prints on a full sheet of printer paper with no problem and allows you to add other elements easier than you could do in PicMonkey.
Step 5 – Add Your Image to the Document
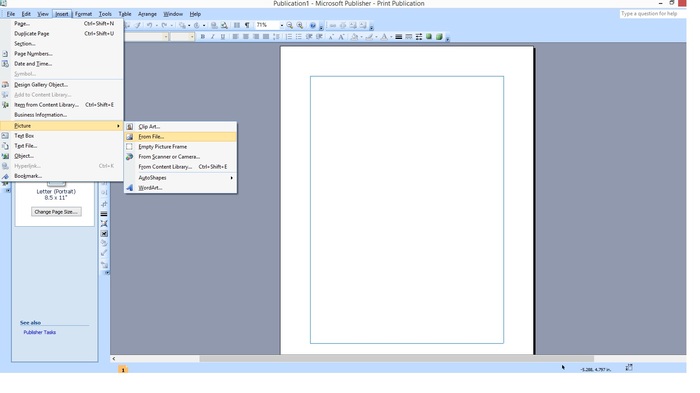
Insert the picture you created in PicMonkey on the blank Publisher document.
Step 6 – Fit Image to Page
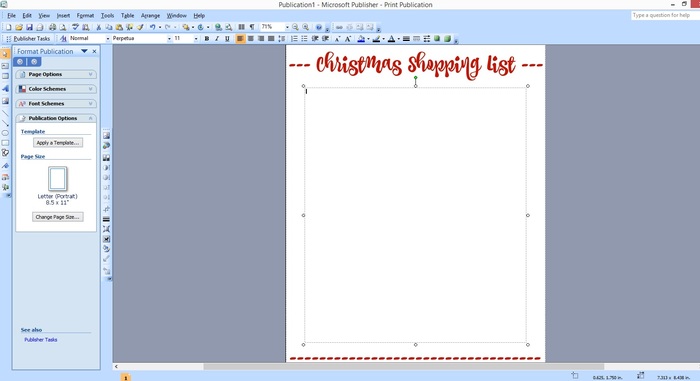
Drag the picture to make it fill up your page. As you drag the edges, Publisher will give you visual margin indicators. Try to keep the design within the printable margins of the page (this will be slightly inside of the page border).
The first time you do this, you might get it wrong but you will quickly learn what the margins should be. Just create your first printable, and do a test print to see how it looks.
Step 7 – Add a Text Box
Insert a text box centered on the blank part of the page.
Step 8 – Fill in the Text Box
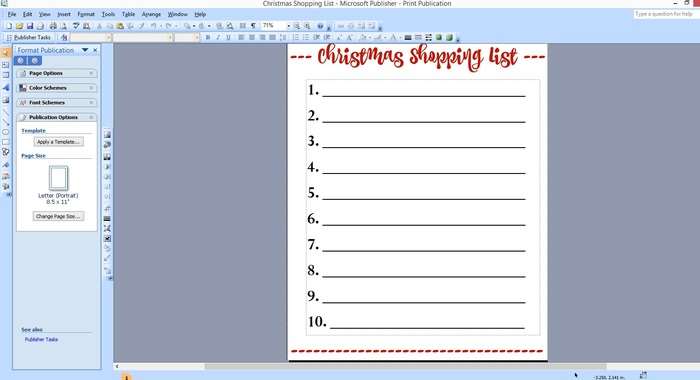
Fill in the text box with bulleted items, shapes, etc. Adjust the size and color of the font as needed. You can create lines with an upper case dash.
This is really fast & easy to do – this part took me about 3 minutes. Publisher gives you margin indicators all along the way so it’s super simple to make all the lines the same length(as opposed to Microsoft Word where lines are hard to line up).
Step 9 – Continue to Design
Copy and paste the first line to make the next. Resize your text box to fit the space as needed if your numbers or lines look slightly off center or the wrong size.
Step 10 – Save the Publisher File
Save your creation as a Publisher file first. This will ensure you can come back later and edit it as necessary.
Step 11 – Save as a PDF
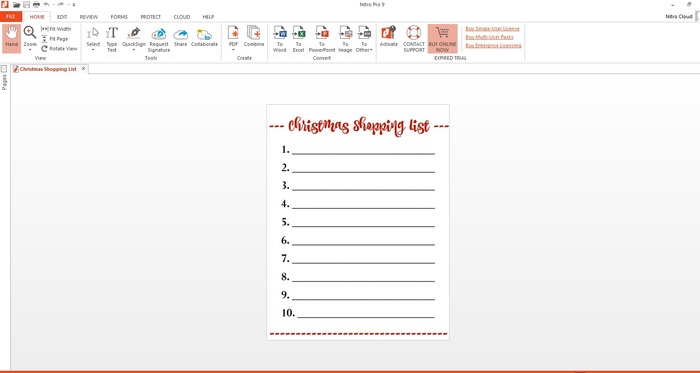
Right after saving as a Publisher file, save it as a PDF file as well. This is what you will distribute on your blog.
Step 12- Reduce Size of PDF Preview
Open the PDF file and reduce the size so you can see the entire image on the screen. On my laptop, I simply hold down the Ctrl button and use my mouse’s roller ball to scroll down, which reduces the size for me. I am not sure how you do this on a Mac.
Step 13 – Print to Screen & Copy to Paint
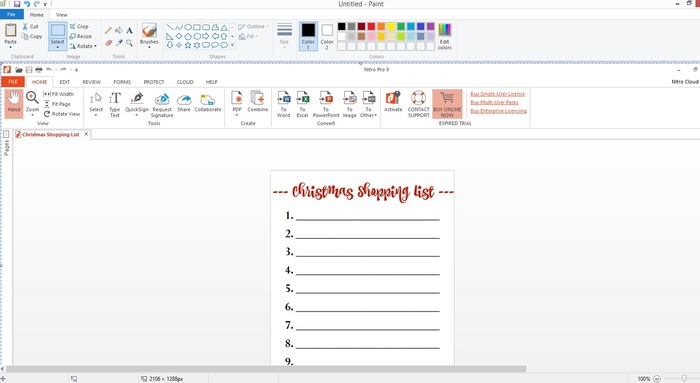
Take a screenshot of the PDF preview image (I do this on my laptop by pressing & holding Ctrl then PrtSc (Print Screen). This will copy what appears on your screen to your clipboard.
Open up Paint and paste the image there.
Step 14 – Crop the Image
Press Select, then crop the image right around the border of it. Click Crop.
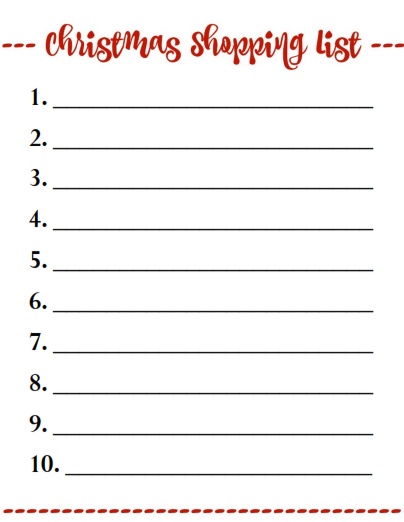
The photo is now cropped. Save it to your computer as a JPG file. This is what you’ll use in your blog post as the picture for readers to preview.
Then…Upload the Image to a Blog Post
Open up your blog post editor and upload your image into the blog post like this:
I do this because it lets people know what they’ll be getting AND because people like to pin images. I like to make my images clickable so when a reader clicks on the image, they are taken to the PDF download. I also link to some text right above the printable. I figure some people like to click on links and some like to click on images, so I give them both options.
As an example, you can see a real post in action here: Christmas Shopping Lists
How to Host Printables on Your Blog
To host my PDF downloads, I use two programs.
- DropBox (alternative: Google Drive) – I upload the PDF file to DropBox so I don’t have to host it on my site. When you’re blog is as printable heavy as mine is, you will begin to experience bandwidth issues and possibly load time issues if you host too many printables. When you upload to DropBox, grab the Share URL for the next step.
- Bit.ly (alternatives: Goo.gl or Pretty Link) – Take the Share URL from DropBox and create a shortened URL in bit.ly. By doing this, you will now be able to track the downloads. I like to change the bit.ly assigned name to a logical bit.ly name so I can easily glance at my listings and see what’s being downloaded. So for this printable, I might change the extension to read bit.ly/Christmas_Shopping_List (Note: This is a completely optional step, but this will be ever so helpful several months down the road when you’re wondering which of your printables was more popular than the rest. I am always surprised by the insights I gain from the tracking links).
That’s it! You now know the super secret method of creating printables in PicMonkey and Publisher. It’s not so complicated – you just need to understand the order of the steps. Now that I don’t have to think much about the process and can just go from one step to the next, I can create and publish a printable in about 30 minutes. Sometimes I will create them in batches and publish them when I feel like it – I think it’s fun to design them, so I don’t mind spending a few hours doing this!
Here are more printables if you’d like to see more examples of my standard printables blog post format. I keep it pretty simple around here. 🙂
Pretty Pink To Do List / Star Coloring Page / Bible Verse Coloring Page
If you liked this post, make sure you sign up for my Blogging Tips Newsletter. I send occasional emails whenever I publish blogging tips like these! Also make sure to join my Facebook group for bloggers who love sharing tips and tricks like these with one another!
Additional Resources
If you have some time on your hands, here are some more blogging resources I think you might like:
- List of Worthwhile Blogging Resources I Recommend
- How I Plan to Double My Monthly Blogging Income to $16,000
- WhatMommyDoes Income Reports (a look into my income strategy)
- Simple Ebook Creation Guide
- Blog Traffic E-book (How I Increased My Monthly Page Views from 17K to 350K+ in 2015)
- 27+ Budget-Friendly Meal Train Ideas - 04/04/2024
- 30 Non-Toy Christmas Gift Ideas for Kids - 10/31/2023
- 50+ Fun Family Christmas Gift Ideas for Every Budget - 10/31/2023












Lisa Morris says
This is wonderful!!!!!! Thank you so much for sharing this. I cannot wait to read through this more in-depth. Thanks again. I am going to share this on my facebook and Pinterest!
Lena Gott says
Wonderful – thank you Lisa!!
Natasha says
Thanks Lena! You’re doing amazing work here and it’s great of you to share how you get your work done. Inspiring!
Lena Gott says
So glad you like this tutorial! Took me quite some time to put together. 🙂
Kelly says
This is a great tutorial! I’ve had some ideas for printables in my mind, but never got around to figuring out how to do them quite right. Thanks for sharing!
Diana says
Thank You! This is so awesome! I totally needed this!
Lena Gott says
Glad you liked it, Diana!
Amy says
How are you able to track the downloads? When you go into Dropbox, can you see where the people came from?
Lena Gott says
Hi Amy – you can only see how many people clicked on your dropbox link.
Roy A. Ackerman, PhD, EA @ Cerebrations.biz says
This is a great idea.
And, for those of you who have a (real) website), you can upload it there for your customers use. Which will increase the traffic on your site (augmenting your ratings)….
Keesha says
Very clearly explained Lena! This is something I definitely want to try for myself. I thought your post was so awesome that I featured it on my weekly “This Should Go Viral” blog post! Check it out!
Lena Gott says
Thank you so much, Keesha! I will be right over! 🙂
Renard Moreau says
[ Smiles ] Wow! I love your pointers on making our own printables!
Lena Gott says
Thanks, Renard!
Linda says
Thank You so much!! I have been struggling to figure this out for my own blog. I followed you step by step. Finally got it done. Thanks again.
Lena Gott says
Wonderful! I’m so glad it worked for you!
Gina Gould says
Thank you so much for sharing this! I just recently started a blog so I am trying to soak up as much information as I can. Your guides and step-by-step tutorials are the best! Thank you!
Lena Gott says
So glad you like it, Gina!
Amanda says
Thank you so much for this step by step! This is very clear & will be super helpful on my blogging endeavors! Love your coloring page printables too!’
Lena Gott says
So glad it’s helping you, Amanda!
Becca says
Ha! I came to your site looking for possible instructions on doing printables. You have such pretty ones! I initially didn’t find it, but then I went to Pinterest and Viola! There it is. Thank you for this! I really appreciate it. I love printables.
Lena Gott says
Hi Becca – I’m so glad you can use this tutorial! I love printables – it’s one of my favorite types of things to publish!! 😀
Alicia says
Wow, super simple and step by step. I’ve been researching this stuff all day – best blog post on this topic that I have found. Thank you for helping!!! Can’t wait to start my printable 🙂 Alicia @ http://www.girlonahike.com
Lena Gott says
So glad this helps, Alicia! 😀
Courtney Marquez says
Love your tutorials on printables!!! They are so helpful! Thank you for sharing:)
Cindy says
Great “how to” post, Lena! Thanks for sharing how you create and set up your printables. I’m hanging on to these instructions!
Nicole says
Thank you times a million! I have been searching for ways to do a printable and you make this seem very user friendly 🙂
Lena Gott says
You’re so welcome!
Heather Arave says
Can you tell me why when I print this in pubslisher the pic monkey file is super small but everything else is normal size?
Lena Gott says
Can you describe the issue a little more? I believe what you’re saying is that when you save the PicMonkey image and insert it in Publisher, it’s very tiny? If that’s the case, then you can just drag the edges to make it larger…but if that makes it look pixelated, then you’ll need to actually create a larger image in PicMonkey first.
Sally says
Thanks for the great tutorial Lena! For the coloring page printables, did you create the flower designs on PicMonkey? I’d love to make some. How did you do it?
Thanks and God bless
Lena Gott says
yes I did! Those flowers are one of the graphics you can simply add to a picture. I just added them in various sizes around the corners of the page.
Jen says
This is so helpful, Lena, thank you! I have both Publisher and PicMonkey am starting on reader freebies and didn’t know how to make basic lists things pretty! So for making a printable like you did with you 2017 blog planner (with spreadsheets), did you also use Publisher or is that with Word or Excel?
Lena Gott says
Hi Jen – My designer actually made that one for me! I wish I could make one that beautiful myself. Lately, I am really liking Canva for simple printables. And sometimes even Microsoft word if there will be a lot of text. Any of the Microsoft Office programs save directly to PDF, which is nice.
Terri Miller says
Thank you for sharing. Do you have any tips on how to send PDF via email? I use Chimp Mail and want to be able to offer my subscribers downloads via email as well or attach a newsletter.
Lena Gott says
yes, the easiest way is to just upload it to something like DropBox or Google Drive, then create a shareable link to give out via email. You can then use that link in your emails or on your blog. You could also create a password-protected page on your site, place the link there, then require an email subscription to get the freebie. Then just share the password to the page in your email. Hope that helps!
Tera elliott says
I wasn’t even looking for anything like this but I’m so glad I found it! This is such an amazing step by step process and I’m so glad you did this! Great job!!
Lena Gott says
Thank you so glad you like it!!
Kerry says
Thank you so much for this tutorial! I can’t wait to try it out. It may take a while for mine to look as good as yours though! God bless!!